How To Use Google DNS Server For Fast and Secure Internet
What Is a DNS Server?
The DNS protocol is very crucial part of the web’s infrastructure, serving as the Internet’s phone book: every time you open a website, your computer performs a DNS lookup.
Complex pages often require multiple DNS lookups before they start loading, so your computer may be performing hundreds of lookups a day.
Each website on the Internet has a 12 digit number (IP Address) that your computer needs to know in order to make contact.
When you try to open website in a browser, your computer queries the assigned DNS server, the DNS server reports the IP address back to you, and the computer starts a connection with the website you requested.
All these activities are going on in background, and so you don’t need to know about DNS to use it. Most people are using a private DNS server that’s assigned by their ISP; however, there are many open (public) DNS servers such as Google DNS server. and Open DNS.
What Is Google Public DNS?
Google Public DNS is a free, global Domain Name System (DNS) resolution service, that you can use as an alternative to your current DNS provider.
When you use Google Public DNS, your client programs will perform all DNS lookups using Google Public DNS, making the site to load faster and its also safe.
Benefits Of Google Public DNS?
By using Google Public DNS you can:
- Speed up your browsing experience.
- Improve your security.
- Get the results you expect with absolutely no redirection.
Google Public DNS Server IP Addresses
The Google Public DNS IP addresses (IPv4) are as follows:
- 8.8.8.8
- 8.8.4.4
The Google Public DNS IPv6 addresses are as follows:
- 2001:4860:4860::8888
- 2001:4860:4860::8844
How To Use Google Public DNS
Before you try to use Google Public DNS, be sure to write down the current server (if any) addresses or settings on a piece of paper.
You need to keep these numbers for backup purposes, in case you want to revert to them at any time.
Go the Control Panel.
1. Click Network and Internet, then Network and Sharing Center, and click Change adapter settings.

2. Select the connection for which you want to configure Google Public DNS. For example:
- To change the settings for an Ethernet connection, right-click Local Area Connection, and click Properties.
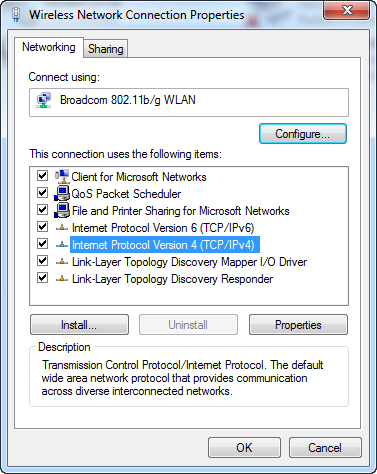
- To change the settings for a wireless connection, right-click Wireless Network Connection, and click Properties.

If you are prompted for an administrator password or confirmation, type the password or provide confirmation.
3. Select the Networking tab. Under This connection uses the following items, select Internet Protocol Version 4 (TCP/IPv4) or Internet Protocol Version 6 (TCP/IPv6) and then click Properties.
4. Click Advanced and select the DNS tab. If there are any DNS server IP addresses listed there, write them down for future reference, and remove them from this window.
Click OK.
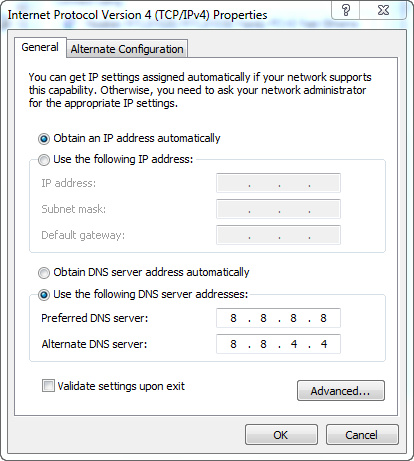
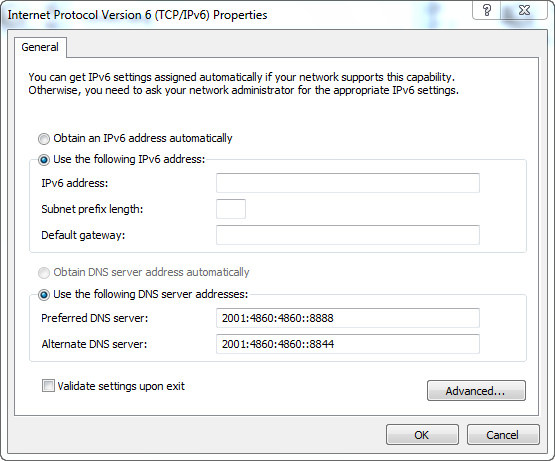
5. Select Use the following DNS server addresses. If there are any IP addresses listed in the Preferred DNS server or Alternate DNS server, write them down for future reference.
Replace those addresses with the IP addresses of the Google DNS servers:
For IPv4: 8.8.8.8 and/or 8.8.4.4.

For IPv6: 2001:4860:4860::8888 and/or 2001:4860:4860::8844

6. Restart the connection you selected in step 3.
7. Test that your setup is working correctly.


Just known another tips to speed up my internet speed and hiding myself from ISP.